
.png?length=320&name=Bienvenida%20(1).png)
If you’re already using our Deal Duplicator app for HubSpot, you’re already saving loads of time by not manually creating deals and duplicating properties. If you’re not using it yet, you should be. 😉
One question we get a lot: how can we customize the "Close Date" on the new deal record? While we don’t have that as a built-in feature (yet!), we do have a workaround to offer you in the meantime.
How to Use Operations Hub Pro to Customize Deal "Close Date"
Ops Hub is a powerful set of features that helps streamline your business processes by automating tasks and organizing your data. One of the most commonly used features of this toolset is the ability to manipulate date properties in your HubSpot CRM. In this blog post, we'll discuss how to use HubSpot Operations Hub to add time to a Deal "Close Date".
Step 1: Activate Operations Hub Pro
To use the Operations Hub features, you first need to have access to it. If you don’t have a license already, you'll need to add on or upgrade.
Step 2: Create a workflow
To add time to the "Close Date" on a deal record, you'll need to create a workflow. Click on "Workflows" from the navigation menu, then click "Create workflow". Choose "From Scratch" and select “Deal-based workflow.” Start with a blank workflow and give it a name.
Step 3: Set up the trigger
The trigger for this workflow will be when a Deal is created by the Deal Duplicator app. To set this up, click on the plus sign (+) next to "Trigger" and choose "Deal” properties. Then, select “Create Date” and set it to “Was updated in the last 1 day.” Add an additional deal property, “Name”, to the criteria and use “contains” to pinpoint a common word in the name of deals that come from Deal Duplicator. This could be something like “clone.”
*If “Name” is not a viable attribute to use in your enrollment criteria, maybe something else like “Deal Stage” or “Pipeline” could be helpful. This will have to be specific to your duplication motion.
Step 4: Add an action
To add time to a deal’s "Close Date", you'll need to add an action to the workflow. Click on the plus sign (+) next to "Action" and choose "Format data".
Step 5: Define the new "Close Date"
Select the property "Close Date" from the dropdown menu. In the “Format” dropdown, select “Add an amount of time.” Set the amount of time to add and the unit of time. For example, if you want to add two weeks, you would enter "2" in the "Value" field, and select "Weeks" from the dropdown menu.
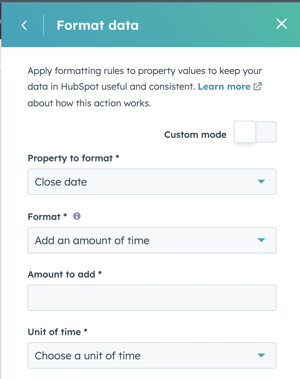
Leave the box checked for “Yes, save the value into a property” so that you can save the output into the “Close Date” field.
Save and continue.
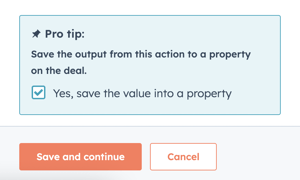
In the box that pops up, copy the property value you just created into the “Close Date” field of the deal you’ve enrolled into the workflow by configuring the settings as pictured below.

Step 6: Test and activate the workflow
Before you activate the workflow, you'll want to test it to make sure it's working properly. To do this, create a test Deal in your HubSpot account and make sure the "Close Date" is set to a specific date. Then, activate the workflow and wait for it to run. Once it has run, check the "Close Date" on the test Deal to make sure it has been updated correctly.
If everything looks good, you can activate the workflow and it will run automatically whenever a new Deal is created or updated.
Save Even More Time With HubSpot Automation
Adding time to a Deal "Close Date" is a simple process with HubSpot Operations Hub. By following the steps outlined above, you can easily automate this process and save time in your business operations. If you have any questions or need help with this process, don't hesitate to reach out to our team for assistance.
